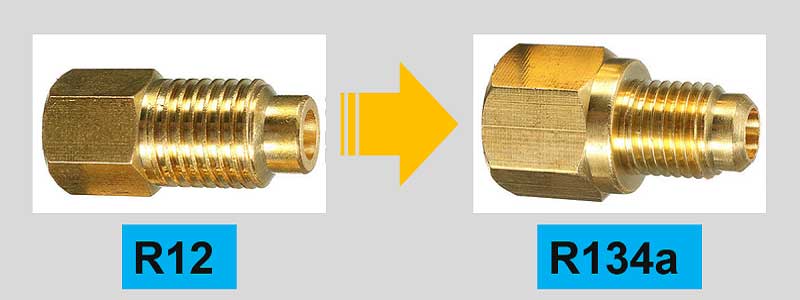
R12 to R134a Conversion, Information, and Necessary parts
The only mechanical differences between an R12 system and an R134a system are that R134a systems mostly have larger condensers and are more strong compressors.
This is mainly because R134a doesn’t cool down as well and quickly and needs a larger space to dissipate heat and is charged to higher pressures.
When you are looking for a conversion of the R12 to R134a, then there should be a thorough research done. If you want to take our advice, then you are in the right place because here you will get to know all the useful knowledge you are looking for in these two mixes.
There must be certain confusions that you might have regarding their conversion, information, and necessary parts, but we got you covered.
So, continue reading to find out a complete package of info about the R12 and R134a and relieve yourself from all the confusions:
What is R12?
R12 is a common coolant and has been used a lot in the early times for useful applications. The scientific name for this term is dichlorodifluoromethane, and CC12F2 abbreviates for its formula containing all the components or substances this mixture is made up of.
It has a very versatile nature, and you can easily utilize it for AC systems, fridges, and deep freezers as a coolant or refrigerant, as we have already discussed.
The best thing R12 is that this coolant is completely safe and non-flammable, and there are no dangers to look out for when you are using it for various appliances.
But there is a problem with its molecules that if fire has been lit near it, then the gas will break down into harsh chemicals that are dangerous to inhale, and their smell literally spreads and causes many diseases.
Read Also: Best Jump Starter for Diesel Review
Importance of R134a
As R12 is not entirely safe for humanity to use, and there are many precautionary steps to be taken care of before utilizing it, R134a, an upgraded coolant, was invented.
It is an effective replacement and caused a stir in the industry when it was introduced because it contains non-toxic chemicals that even used in the prevention of damage to the ozone layer.
This coolant is now used in all types of cooling appliances, including air conditioning systems in vehicles and fridges, freezers, or even similar refrigerants, etc.
It is called Tetrafluoroethane and classified as one of the HFC gases from other coolant variants out there.
It is sometimes also utilized for cooling down overclocked computer systems, and while it doesn’t damage the ozone layer, it is still not the safest choice for you to consider, but anyways it is better than the R12.
Let’s get on with the conversion part and grant your wish to know simple conversion methods of R12 into R134a.
The conversion process:

So basically, there are not many ways to convert the R12 into R134a, but there are two methods that provide the desired results.
Those methods are factory and easy method, so one of them is the best choice, and you will discover that through the whole process explained below but there is a step to be taken care of before you opt for any method for the fact.
That step is preparation, and as you might know, R134a increases discharged pressure while also raising the compressor workload.
It is up to you to decide that what kind of system it has, such as; a Harrison DA6 is replaced with an HD-6 or HR-6, respectively, while a ford FX-15 compressor should be replaced with an FS-10 compressor.
Read Also: Best LED Headlights Review
Here are the steps to convert R12 into R134a:

Firstly, you will have to totally make your AC system vacant, and following the discharging process, help ensure that you will recycle it properly.
Now see to it that if your AC compressor is in good condition or not, if yes, then you need to keep it otherwise replace it with a new one.
Now is the most important step that needs to be taken care of. You will have to completely wipe off any traces of the R12 coolant from your system.
If you can’t do it without proper space and tools, then utilize a workshop for the task, and you will have to flush and restore the R12 for recycling it with a specific tool.
Now coming on to the condenser, remove all traces of R12 from it with a flush kit and also see to it that no particles are left even.
The AC lines and hoses might still have some traces of R12, and it’s your responsibility to flush it out as well.
Whenever a process takes place in a vehicle, it drains out its fuel and needs an oil change. This is what you have to do in this step, just make sure to replace the old oil with a new one in the compressor and also see to it that you do this according to the specs of the compressor.
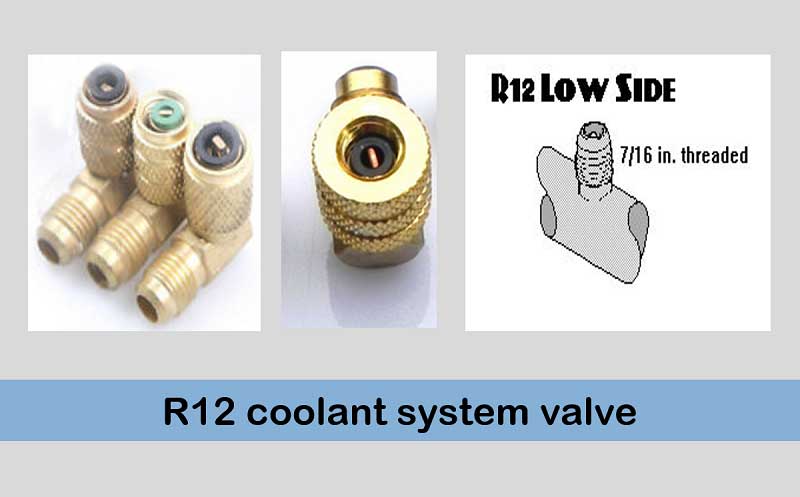
So, there are also low and high-pressure switches that are also known as factory pressure switches. These switches have to be replaced if you want to convert your R12 coolant into an R134a one.
The accumulator dryer needs to be replaced after this, and this is also a necessary part of the conversion procedure.
Now coming on to the office tubes and hoses, well, they need to be replaced with new ones as well.
There are certain O-rings in the system, and they get old after a while and have a deep connection with R12, so they need to be replaced with new ones.
Now you just need to fill up the compressor with the R134a oil and attach the R134a retrofit label. Viola! You are good to go.
So, if you have read the whole conversion process, then you might already have understood that this is the factory method and quite an expensive one for the fact.

You will have to spend a lot of time on this method to be implemented and also be ready to invest a lot of dollars on this conversion, but believe us or not, this is the most effective method. If you want to know about the easy method, then it is:
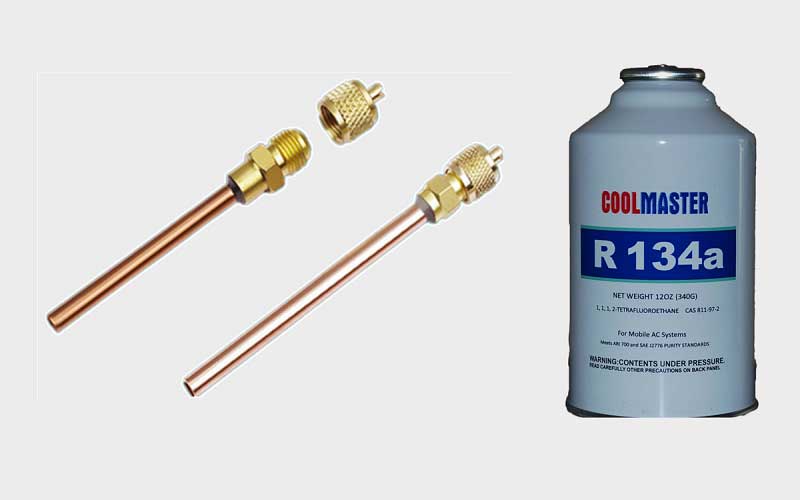
You will need to convert the R134a retrofit kit with R134a port adapters, oil, port caps, and label.
R134a pressure switches will also need conversion in the easy method.
This method is a quick and easy one, with no specific detailed instructions but you can take help from a car specialist to perform it because this method is not that expensive as compared to the factory method and rest assured it is effective but not as much as the factory one of course.
Tools needed for conversion:
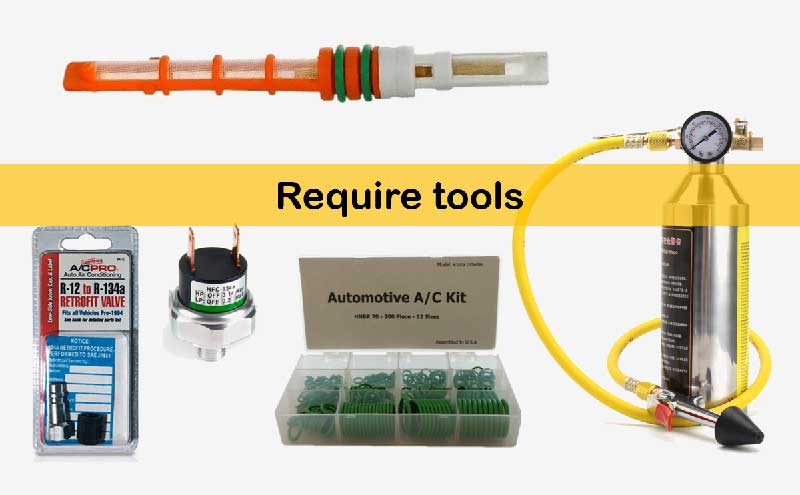
So here are some useful tools needed importantly for the conversion process and one cannot miss any of these tools listed below:
- C flush kit.
- R134a retrofit kit with port adapters, oi, port caps, and retrofit label.
- Complete the HNBR O-ring kit specifically for your vehicle.
- R134a orifice tube.
- R134a pressure switches.
- New barrier style hoses for pre-90’s vehicle.
- New R134a compatible accumulator dryer.
These tools are highly necessary for you to keep in your kit when converting R12 into R134a and keep this in mind that these tools might be useful in future conversions as well.
You can safely invest in these tools and find yourself with the most upgraded form of coolants that you can utilize in most cooling appliances.
Read Also: V6 VS V8 Car Engine – What’s the Differences?
Quantity of R134a needed:
So, there is also a specific amount of R134a needed, and since it is low density than the R12, you would have to convert the charge weight to get the proper one during the retrofit process.
You will have to fill the system with 80% of the factory’s specified capacity to accomplish the best cooling experience.
Also, you can use a given formula and find the proper refrigerant capacity for your current system and multiply the R12 charge specification by 90%!
Then simply subtract ¼ pound. As you know, it is a difficult process cooling down the R134a, so when you properly charge it, your system won’t cool down that easily.
So, you will have to look out for the amount of R134a needed for your conversion process at the end and take care of the residual quantity as well.
Final Verdict:
So now that we are done with the whole article and each and every aspect regarding the conversion of R12 and R134a is discussed, we can safely say that you must be satisfied now.
Every single bit of this information is researched for your convenience so you can easily convert your R12 refrigerant into the R134a one and also get an upgraded form in your appliances or cars, respectively.
If you have any other queries, you can deeply research on your own as well, but we can assure you that this is all the info you need on these two refrigerants/coolants.
Share this content:


Post Comment