DIY Shuffleboard
Need to realize how to build shuffleboard without anyone else and at a reasonable expense? Shuffleboard is an exceptional gaming device you can have in your home. However, going through a large chunk of change purchasing shuffleboard sounds ridiculous and pointless. Numerous shuffleboard manufacturers utilize their inventiveness to give their tables an individual, custom look. You can set aside cash by building one yourself. In this article, there is a rundown of DIY shuffleboard table ventures that are modest and simple to make.
You can have some good times on any size shuffleboard. When constructing a shuffleboard table, you need to think about the size of your room. You need to leave no less than 2 feet on each end of the table to stand serenely and play the game.
Buyers Guide
THINGS YOU WILL NEED TO CONSTRUCT A SHUFFLEBOARD TABLE?
Before you make a shuffleboard table, you will require various materials. The majority of them are promptly accessible at your neighborhood carpentry shop.
- Circular Saw
- Plywood or MDF
- Washers, screws, and nuts
- Paint
- Pens
- Polyurethane
- Levels
- Staple weapon
- Power drill
- Hammer
- Straight edge
- Tape measure
- Sawhorse
- Random orbital sander
- Biscuit joiner
- Biscuit
- Razor sharp edge
- Mending plates
Keep in mind, the sort of provisions you get decides the nature of the shuffleboard table you assemble. So in case you’re on a strict financial plan, think about utilizing MDF. Nonetheless, guarantee you support the playing surface well to abstain from unlocking. Then again, on the off chance that you have sufficient money to spend and might want to make an expert-like table, go for strong wood. Great structure materials ought to be dependable and ready to offer dependability.
When constructing a shuffleboard two things are vital; the legitimate materials and the appropriate estimations. They are necessary to getting extraordinary shuffleboard. You can begin by drawing the elements of the table down on the outer layer of the paper to make the estimating and the structure simpler. Begin cutting and making the support and the playing surface. Make the twisting rings with paper and line the surface with a cover. Then, at that point, make the legs and that is it for the shuffleboard.
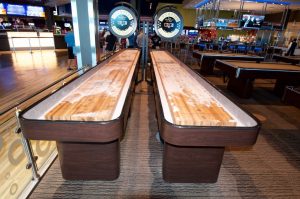
Shuffleboard tables can be an extraordinary expansion to any home. Since they can be extremely long and are normally made out of expensive maple wood, getting one might be costly. Building your own can set aside cash. It can be a remunerating project you remember for quite a long time. Whip out your carpentry abilities, put in an honest effort or wax on your shuffleboard table, and play from the accommodation of your own home. The essential capacity of the table is to hold everything together, offer help, and catch the pucks. So guarantee you utilize quality materials on it. Therefore, more thought should be on the materials utilized on the playing surface. They must be level, uniformly made, and smooth.
Figure out what size you need your table to be. The size of a shuffleboard table can go somewhere in the range of nine feet to 22 feet. Remember the measure of room you need to assemble and store it. You wouldn’t have any desire to fabricate a fourteen-foot-long table in a twelve-foot shed. Recollect you need somewhere around two feet of extra space on each finish of the table to play. The size you settle on will influence what measurements and plans you use for the playing surface, the bed, and the legs.
INSTRUCTIONS TO BUILD A SHUFFLEBOARD TABLE (DIY) METHOD
- Wanting to fabricate
- Plan or discover measurements for each piece of the table.
You can discover measurements for shuffleboard tables on the web. They can save time and assist you with keeping away from botches. You can find definite plans that reveal to you precisely how long the table ought to be, the width of the crate, and the tallness of the legs. Guide out the components of each board you use, if you make arrangements yourself.
- Settle on the kind of wood for the playing surface.
While maple or oak will give you the most solid table, these materials might be excessively costly. For something all the more tolerably evaluated, consider utilizing pressed wood and bamboo flooring for the surface, which can be similarly as great whenever it’s fixed and finished. Use mahogany for the trim, assuming you need an exemplary touch.
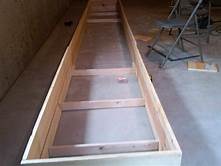
- Making the Box and Legs
- Cut sheets for the sides.
The sides of the container ought to be strong, and on the off chance that you can manage the cost of hardwood that is ideal, you can use many kinds of wood. Spot your board on top of a sawhorse so the slice is made opposite to where you’re standing. Cinch a metal straightedge, or a straight board, down to use as an aide. Painstakingly run your roundabout saw over the space you need cut.
- Remember you will require space for drains.
The case ought to be six inches longer on each end and a few inches more extensive than the surface because the barricades square the case, take outrageous alert when cutting them. Adding any sheets that are cut inaccurately will bring about a lopsided playing surface.
- Affix sheets together.
Line blocks along the edges of one another to make a content outline. Pre-drill openings, in case you’re utilizing a gentler wood like pine. This will forestall wood parting. Use wood messes around the edges of the crate to affix them together.
- Add supports to the sides.
Since your table will be long, support the length of the container with extra sheets to hold the wood back from twisting. Build up the sides by laying sheets opposite the length of the container. Space portions of the board about a foot separated and place them towards the underside of the crate. Secure them with wood screws at the edges.
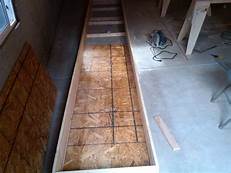
- Add compressed wood to the container.
Use sheets of the compressed wood slice to the right measurements to lay over the backings. Secure the compressed wood along with retouching plates. Drill wood screws through the wood and a portion of the backings. There’s no compelling reason to bore through each help. Make use of enough screws to join the compressed wood.
- Lay rug in your container.
The rug in the container will look pleasant when the playing surface is laid, and it will get and mellow the blow of pucks during an energetic game. Cut the floor covering into pieces for the base and each side. Staple away to append it to the wood.
- Try to use a good staple firearm for this work.
Look into battery-worked firearms, which might staple a bit more grounded than manual ones.
- Cut the table legs to the right length.
The highest point of the playing surface ought to be around three feet from the beginning. Recall the remainder of the table will lay on the legs. Change the length of the legs to the right elements of the general table and cut them appropriately. If you’re constructing a table around sixteen feet or more, extra legs will be expected to help the weight.
- Use sheets to assist with appending the table legs.
Rather than screwing legs straightforwardly into the lower part of your container, append them to isolate sheets first. It will additionally settle your shuffleboard table. You can utilize bits of pinewood slice to the width of your container for each pair of legs. Drill screws into the sheets to join them to the legs.
- Screw the sheets onto the crate.
After you join the legs to isolate sheets, you can connect the sheets to the underside of the crate. The position where you need the legs to be on the container and drill into the sheets to join them.
- Making the surface
- Make a help construction to lay the surface in.
You might require something to hold your playing surface up. You can utilize nuts, fasteners, and rails to glide the game board on. Drill openings on each finish of the crate from the base. Slice through the cover with an extremely sharp edge before you drill. Screw a fastener from the base with the goal that it appears through the container. Spot a rail or tie bar on top of the screw and secure it with fasteners
- Ensure your surface is smooth and level.
Whatever wood you choose to use for the surface, examine it for any Knicks, twisting, or surface defects. The level should be to decide whether it’s even. Take any difficult regions down, until the surface is smooth.
- Combine surface pieces.
wood is probably not going to arrive in a piece as long as you need it, you should follow sheets together for the playing board. Consolidate two sheets by first cutting the edges with a roll joiner. Have a bread roll prepared, cover it in paste, and spot it between the cut edges. As it dries, the paste extends, giving you a strong association where the edges meet
- Build up the join.
Forestall the region you combined from segregating by supporting it with the board on the underside of the surface. You can utilize whatever board you have to help with this. Pine is cheap. Turn your surface over, cut a piece of board the width of your surface, cover the crease where the surface joins, and drill the board down
- Paint or stain the playing surface.
Whether you decide to use paint or color will rely a great deal upon what sort of wood you picked. On the off chance that you overcame working with a customary strong maple surface, you will need to utilize stain. On the off chance that you settled on MDF, utilize a dark, oil-based paint to assist with making it more strong. Utilize either a water-put together or oil-based paint concerning pressed wood
- Paint or draw your game board.
Consider drawing your game board utilizing a felt tip pen or another fine drawing apparatus. Shuffleboard tables regularly take into account numerous sorts of scoring: lines in the standard game and circles in twisting principles. Choose if you need to play utilizing both scoring frameworks. Ensure paint on a superficial level is dry before drawing on it
- Seal with polyurethane.
You should seal the surface to ensure it and consider play. There are many kinds of polyurethane seals. What sort of paint you utilized and how long you have on your hands can point you the correct way. An oil-based poly will set aside more effort to dry, yet can be more solid. Don’t use oil-based over a white surface, since it can yellow over the long run. A water-based poly dries rapidly, yet can’t be utilized over oil-based paint.
- Lay and secure your surface in the case.
You ought to have the option to lay your surface on the rail structure you worked in the case. For extra help, utilize more screws, stray pieces in attentive regions.
- Wax and splash the surface with silicone.
Shuffleboard pucks should coast on the outer layer of your table. Wax it with furniture clean and buff with a delicate material. Use a silicone shower to expand the existence of your waxing position and further seal the table.
The most effective method to pick the shuffleboard that fits
- Size
- Indoor versus open-air use
- Table thickness
- Wood type
- Climatic agents
- Surface covering
- Surface ebb and flow
- Scoring framework
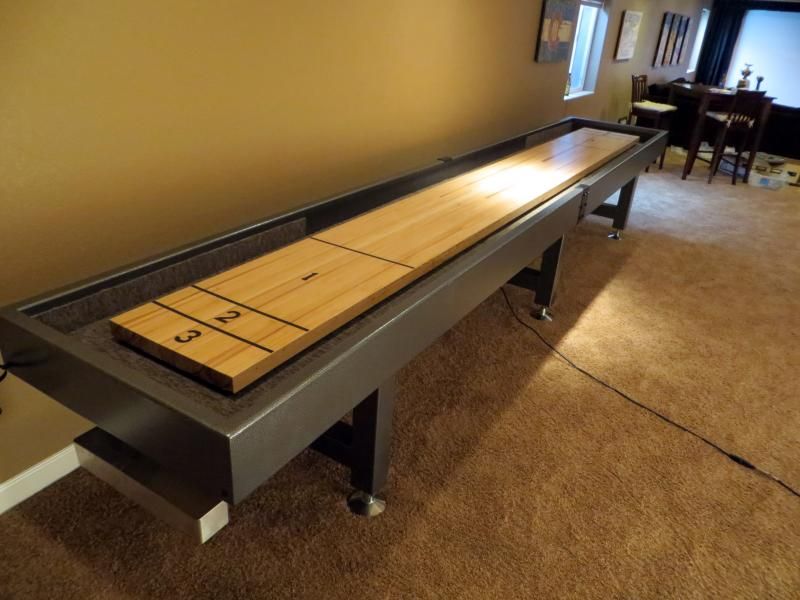
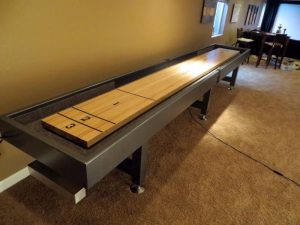
Finished Project 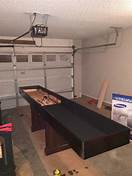
There are many kinds of wood you can utilize, contingent upon your spending plan. You can fabricate a shuffleboard table with no experience and be effective. You do not need huge loads of devices, materials, or woodwork information but be prepared to invest time and energy into your task. All you need is interest, and we will take you through the remainder of the interaction. This is certifiably not a one-day project. 7 days ought to be sufficient in case you’re reliable. It may take somewhat more if you don’t have a lot of extra time.
Share this content:


Post Comment